Gynopedia needs your support! Please consider contributing content, translating a page, or making a donation today. With your support, we can sustain and expand the website. Gynopedia has no corporate sponsors or advertisers. Your support is crucial and deeply appreciated.
Contribute
We invite you to share your knowledge & help edit Gynopedia! Here's why:
- No prior wiki editing experience necessary! All are welcome.
- You don't need to create an account (but you can, if you want).
- You don't need to be a medical "expert." You just need to have useful & reliable information.
- It's super easy to edit. Just search for a country or city, and then click "Edit."
- The information you provide can help people around the world.
- We're a grassroots labor of love! No advertisements, corporate sponsors, or sponsored content.
Below, you can read our guide on how to contribute information. But, if you're confused, want extra guidance, or just want to say hi, please feel free to reach out! You can email us (gynopediawiki@gmail.com), or find us on Facebook (@gynopedia), Twitter (@gynopedia), or Instagram (@gynopedia_global). Happy editing!
The Basics: How to Contribute Content
1. Choose how to edit (username or IP)
Do you want to edit completely anonymously? If you want to be 100% anonymous, we recommend that you create a Gynopedia account -- it's super easy, and all of your edits will be anonymous, since they'll be under your username. If you don't care about anonymity, you can edit immediately without creating an account. Your edits will be displayed under your IP address in the Edit History of the page, which is publicly viewable. Some people care about keeping their IP address private, and some don't. It's up to you.
2. Search for page to edit
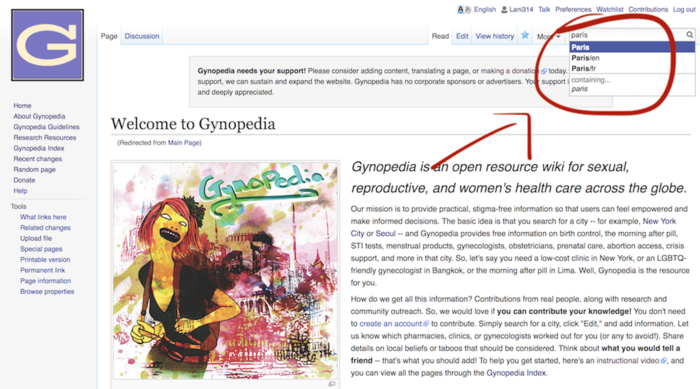
After you've either created an account or decided to not create an account, you're ready to begin editing. As a first step, you should search for the city or country page you want to edit. To do this, go to the Search bar (in the top right corner of any page), and type in the name of the location (for example, "Paris"). If the page has been translated into multiple languages, you may see multiple entries for the page. To edit the original English page, select the first search result that you see (e.g. "Paris").
3. Begin Editing
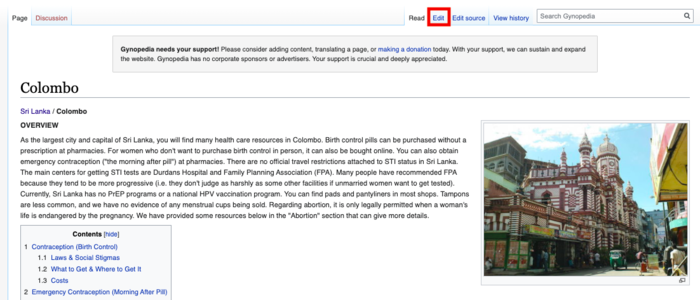
Once you're on a page, you can begin editing the page. You can either choose to edit the whole page (click the "Edit" link at top of page) or a section of the page (click the "Edit" link for a particular section). You also have two types of editing modes to choose from: VisualEditor (recommended for beginners), and Source Editor (a more advanced editing tool).
VisualEditor
If you're new to editing Gynopedia or other wikis, it is strongly encouraged that you use VisualEditor. It's much easier to use. Here's how you use it: Click the "Edit" button. You will then be given a visual view of the page to edit. When you're in VisualEditor, the user experience is very easy. You edit this page like how you would a Google Doc or Microsoft Word document. No code or special skills are necessary! The VisualEditor is strongly recommended for beginner editors, but a lot of advanced editors like it too.
Source Editor:
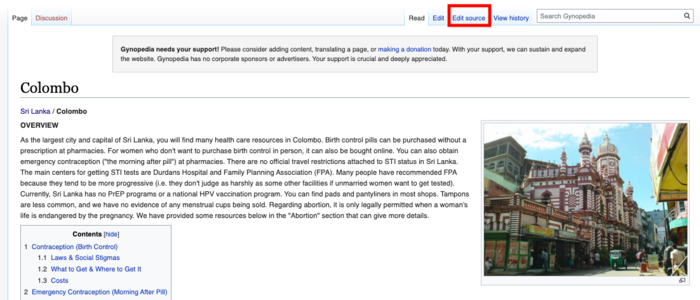
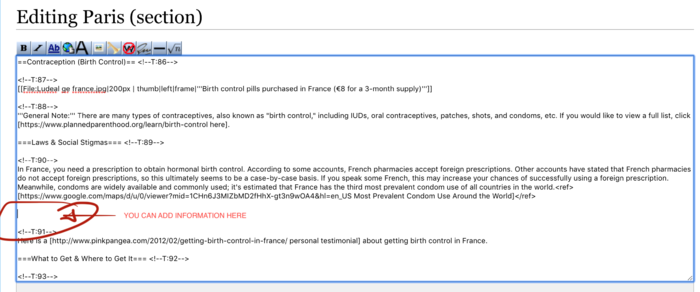
If you click "Edit Source," you will be in the Source Editor. When you're in this mode, you edit the page in wikitext, which is sort-of like a simplified HTML. Overall, this editing style is a bit more complex, so it's not recommended for beginners. But, if you have experience editing in wikitext or you would like to try it out, please do give it a shot! It's not very difficult, and it's easier to customize your edits in exactly the way you want.
One important note: Sometimes, pages are only available to edit in the Source Editor. This is because they have been translated. Unfortunately, the Translate extension is not compatible with VisualEditor, so you should opt for Source Editor with the pages. Most people won't find it too difficult to use -- but, if you need help, please feel free to reach out to us!
4. Save Changes
Once you're done with the edits, scroll to the bottom and press "Save page." You can also preview how your changes will look before saving, if you click "Show preview" (just remember to click "Save page" afterward).
5. Review Changes
Your changes will be immediately saved on the page. Make sure to review your changes and confirm that they were saved correctly. If you want to make any changes, you can click "Edit" to update the page. Note that your edits will be archived under your username (if you created an account) or your IP Address (if you didn't create an account).
7. You're done!
You should now be finished. Moderators of Gynopedia will review your changes and confirm that the edits are not spam or abusive content. They'll also make sure that the information is relevant and reliable to the community. If the content is valid, your edits will be officially accepted to be included onto the page for all Gynopedia readers to see.
Extra Stuff: Customize & improve your edits
1. What kind of information should I add?
If you don't know what to add, think about this way: What would you want a friend to know? What's crucial, reliable, and real information that can help people in a time of need?
2. How to add citations
If you add information that is based on personal experience, like a testimonial or first-hand account, you don't need to cite your source. Just state that is based on a personal experience, and add the date and location. For example, "Birth control pills were around 20 euros a pack (personal experience, Florence, Italy, 2015)."
However, if you are adding information based on research, you should cite your sources. Generally, if you have added any official information about history, policies, or statistics, you should cite your sources from veritable and trustworthy sources (likes newspaper publications, academic journals, and reports from the UN, WHO, nonprofits, and NGOs, etc). We have provided information below on how to do this.
Citations in VisualEditor:
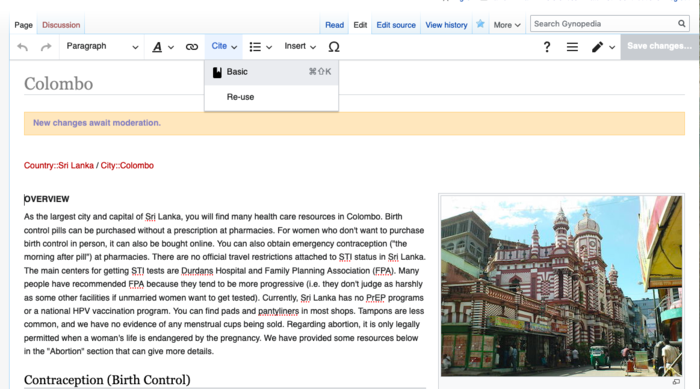
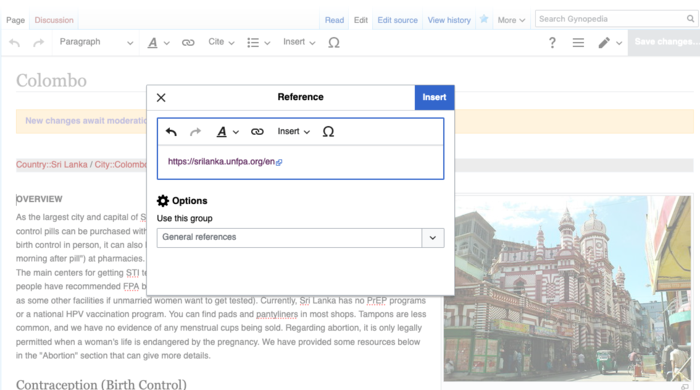
Click on "Cite" in the editor toolbar. Then, to add a new citation, click "Basic." Then, copy and paste the URL of the citation. If you are using a book or a non-digital source, you can add in information on the citation. You can then reuse the same citation later in the text by clicking "Re-use."
Citations in Source Editor:
Here's the format for adding an individual citation:
Childcare in Sweden is blah blah blah.<ref>[http://www.nytimes.com/how-swedish-childcare-works New York Times: How Swedish Childcare Works]</ref>
If you will use the same source multiple times, here is how you cite the source (the first time):
Childcare in Sweden is blah blah blah.<ref name="swedish-childcare">[http://www.nytimes.com/how-swedish-childcare-works New York Times: How Swedish Childcare Works]</ref>
Once you have cited the reference the first time, here is how you cite the same reference (subsequent times):
<ref name="swedish-childcare" />
The citations will appear as a footnote in the "References" section, which can be found at the bottom fo the page. To learn more about adding citations, check out this article on Cite extension.
3. How to add links
You can add internal links (to either Gynopedia pages) or external links (to other websites).
Links in VisualEditor:
Go to the toolbar and click on the link icon (screenshot example below). You will have a choice to add a Gynopedia link or an external link.
Links in Source Editor:
For internal links, you use double brackets (see example below):
You can visit the [[Paris]] page of Gynopedia for more information.
For external links, you use single brackets (see example below)
You can visit the [[https://mediawiki.org MediaWiki]] MediaWiki website for more information.
For more details on source editor citations, you can follow this guide
4. How to add sections
Sections in VisualEditor:
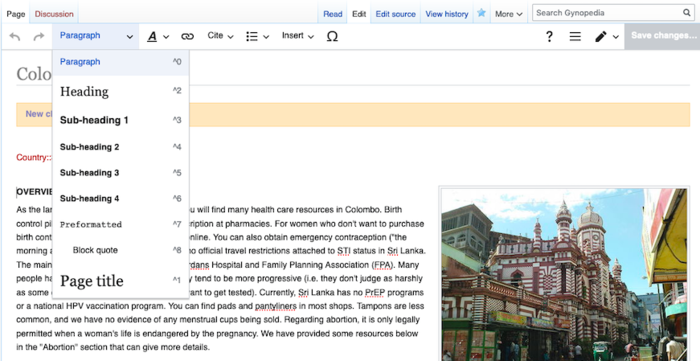
To add a new section in VisualEditor, go to "Paragraph" in the toolbar. Then, you can choose whatever typing of formatting you want. If you want to type in plaintext, choose "Paragraph." If you want to have a special type of heading, you can choose from one of the heading options available.
Sections in Source Editor:
You add sections with the "=" sign. So, for example, if you want to make a header section, it looks like this:
= Header =

== Subheader ==

=== Sub-sub header ===
5. How to add images
Images in VisualEditor:
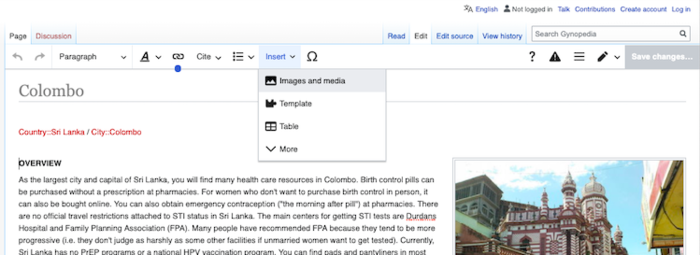
To add images, go to Insert > Images and media in the toolbar.
Images in Source Editor:
- If you are adding a new image, upload the file at the Special:Upload page.
- Add the image file into the page in the following way (see example below). In the below example, I have specified that I want the file to be a thumbnail, aligned to the right, at 400 pixels.
[[File:ImageName.jpg|400px | thumb|right|]]
Additional Resources
- If you want to get a sense of some of the sources we commonly use to conduct research and develop content for Gynopedia pages, please visit the Research Resources pages.
- If you want to know more about Mediawiki (the software that Gynopedia is built on) and how it works overall, click here.
- If you want to know more about open source software, click here.
- If you wan help editing or to just say hi, reach out to us! You can email us (gynopediawiki@gmail.com), or find us on Facebook (@gynopedia), Twitter (@gynopedia), or Instagram (@gynopedia_global).

